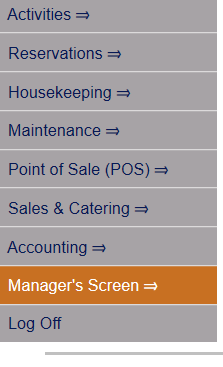
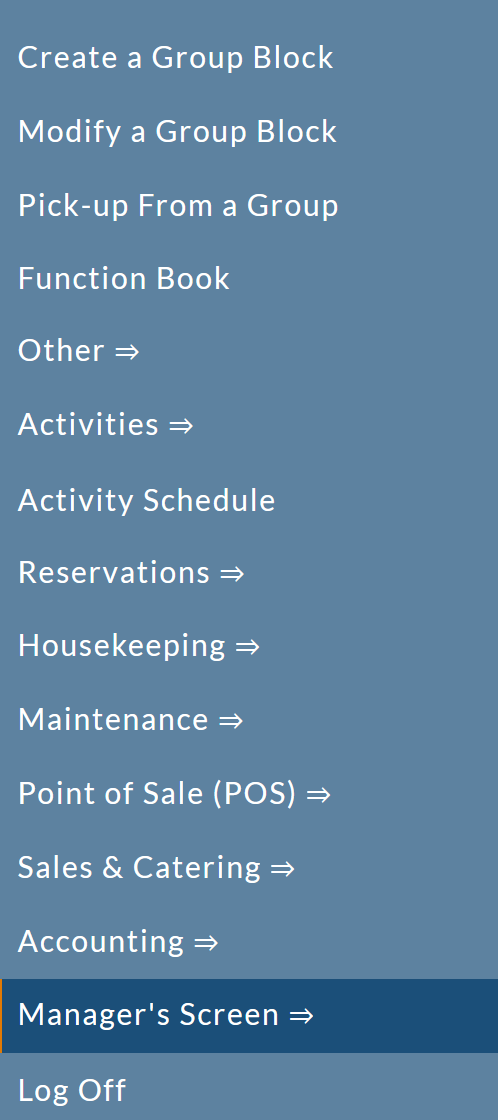
Select Managers Screen from the Quick Menu on the left side of the screen, then select Configuration > Activities > Schedule Type.
Select Manager's Screen to be taken to the Manager's Commands Menu screen.
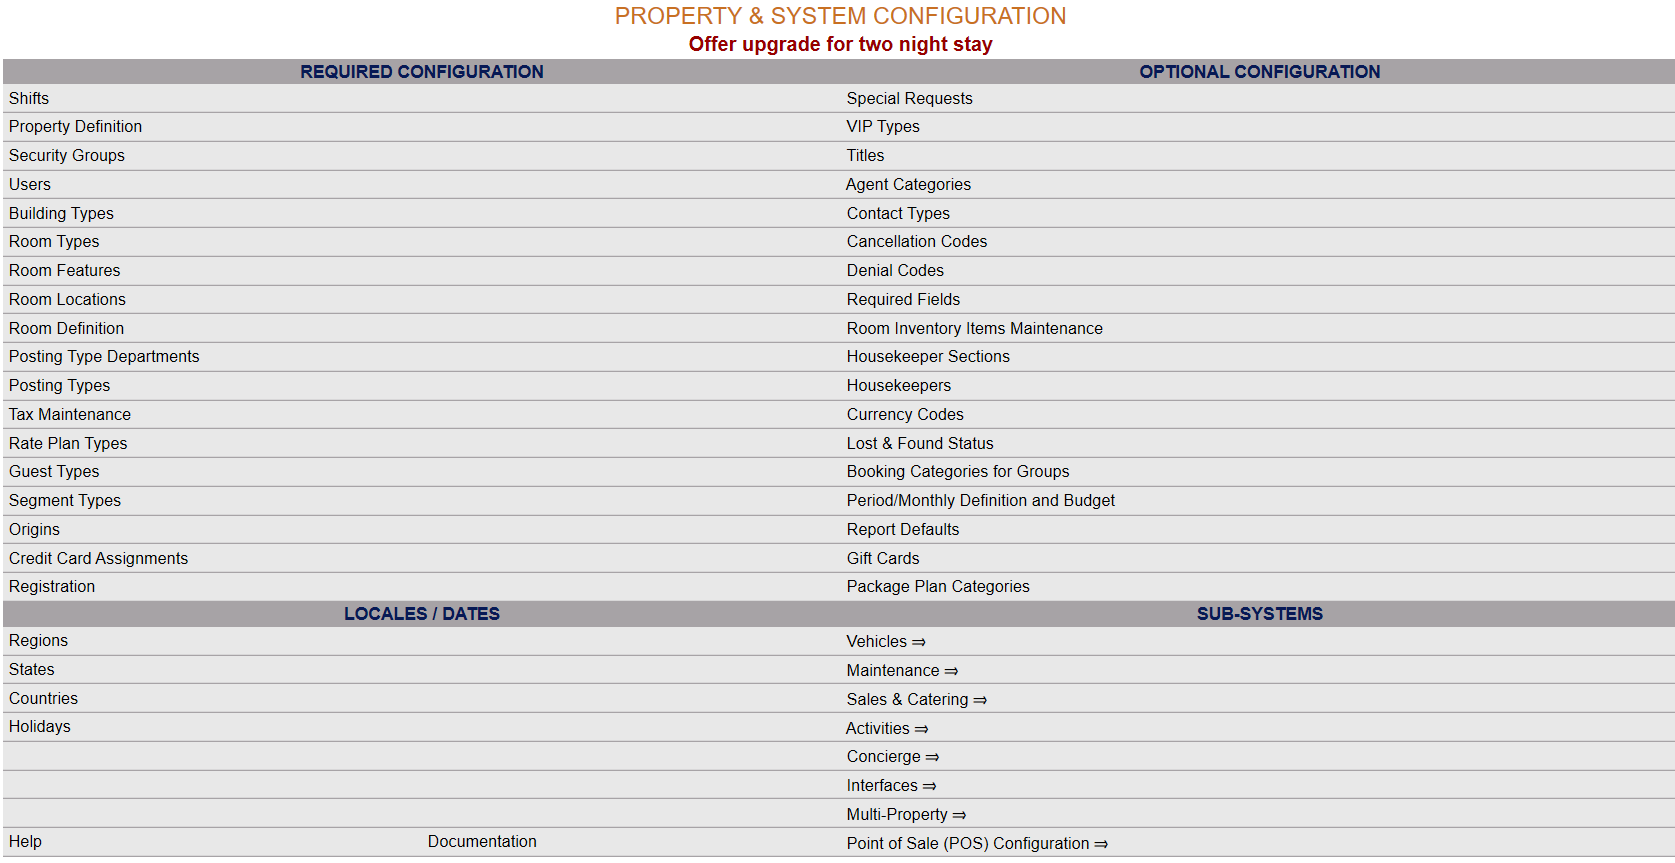
Select Configuration to be taken to the Property and System Configuration screen.
Alternately, you may also be able to select Configuration directly from the Quick Menu, if the menu has been set up to include the Configuration option.
This will take you to The Property System Configuration Menu.
The list of property configuration options are divided into four sections, which are Required Configuration, Optional Configuration, Locales/Dates and Sub-Systems.
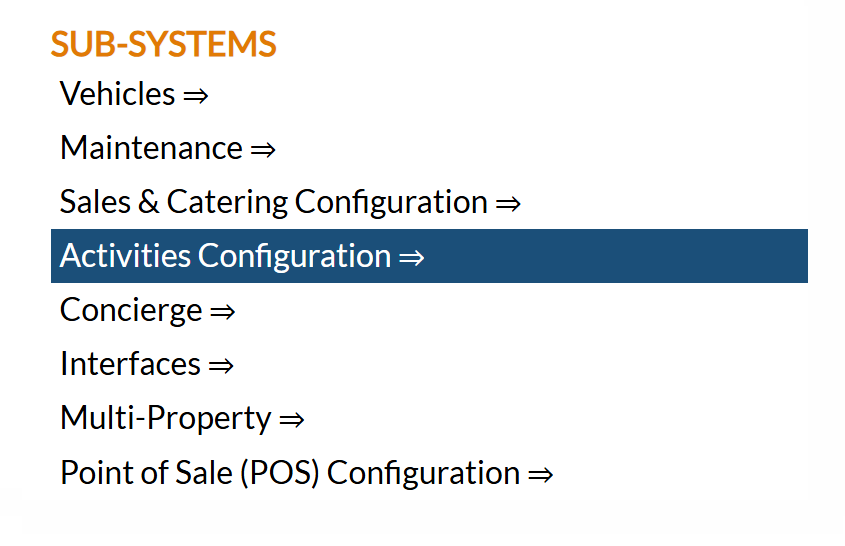
Select Activities Configuration => from the Sub-Systems section.
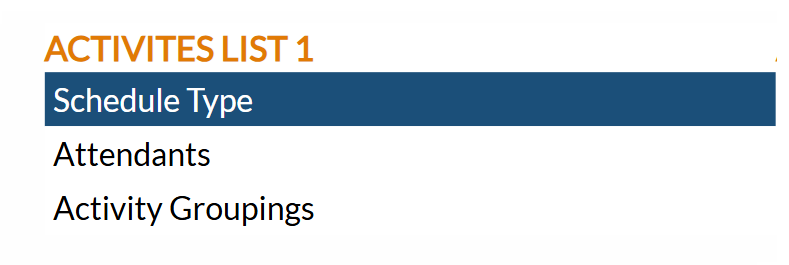
This will open the Activities Configuration Menu, which has two sections, Activities List 1 and Activities List 2.
Select Schedule Type from the Activities List 1 section.
When accessed, the Schedule Types Configuration screen will open.
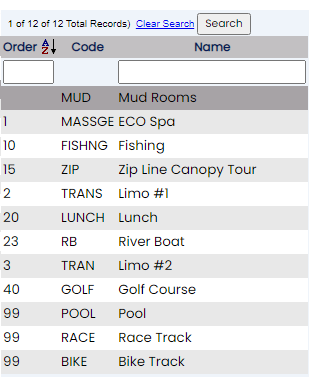
The Schedule Types screen display is split into two frames, with the left side of the screen displaying a list of the already configured available Schedule Type categories, such as Spa, Course Golf or Transportation. The list shown is dependent on what has been configured already as available for your Property.
The right side of the screen provides the configuration fields you need to complete in order to add or edit a Schedule Type, in three separate tabs (General, Activity Types and Facilities). By default, the General tab will be open when the screen is opened. The General tab allows you to enter the name, code and list order of the Schedule Type, with start and end times for its availability, and to select the custom e-mails and custom text messages that may be sent out to your guests using activities with the Schedule Type. The Activity Types tab allows you to generate a list of activities available in the Schedule Type, and the Facility tab, the list of facilities that can be used for scheduling the available activities.
Any changes made on the right, once saved, will be updated in the listings to the left.
The currently configured options are displayed by:
Order: List Order of the Schedule Types. This will display your Schedule Types in the order you desire. If there is no list order number, the Schedule Types will be displayed alphabetically.
Code: The code given to the Schedule Type, a short version of the name.
Name: the name of the Schedule Type.
Your options include the following:
Generate a new entry:
Click the New ![]() button from the toolbar to add a new Schedule Types record.
button from the toolbar to add a new Schedule Types record.
Complete the fields described below.
OR:
Select an existing Schedule Type from the list on the left, and click the Replicate ![]() button from the toolbar. Then change the field information as described below.
button from the toolbar. Then change the field information as described below.
Edit the current selection:
Change the field information described below.
Code: Each Schedule Type must have a unique code. You should make this code as simple for your staff to understand as possible. Codes can be up to 10 characters.
This field is required.
List Order: This determines in what order the Schedule Types appears listed in the interface.
Enter a number into the List Order field.
This field is optional, however we recommend that you list the Schedule Types in the order you prefer. This makes it easier for staff to find the Schedule Types they need. If there is no list order number, the Schedule Types will be displayed alphabetically.
Name: This is the name of the Schedule Type. Enter the name into the field manually (for example, the name of your Spa, such as ECO Spa, or the specific vehicle used for transportation, such as limo #1).
This field is required
Start Time: Time that the Schedule Type schedule starts. This is a drop-down menu of time throughout the day broken down into 15 minute increments. From 5am-11am. Select one or leave blank.
End Time: Time that the Schedule Type schedule ends. This is a drop-down menu of time throughout the day broken down into 15 minute increments. From 3pm-12am. Select one or leave blank.
Note: When a particular Schedule Type is being viewed, if start and end times have been selected, the activities in it may be scheduled for any time subsequent to the Start time and prior to the End time. This helps prevent activities being scheduled when the facilities are not actually available (for example, you would want to ensure that your Spa Schedule Type could only have activities scheduled when the Spa is actually open). The Activity Schedule may show whatever time range you specify, however If you attempt to schedule an activity outside the Start/End times specified during configuration for the Schedule Type, Skyware Systems will instead display an error message, informing you that the it is "outside the Start/End times for this schedule".
Note: IF you wish an activity to be available ON THE BOOKING ENGINE with a different schedule to the Schedule Type start and end times (for example, you may have multiple facilities assigned to the schedule type available for the same activity type, with staggered use times, or a particular activity might not be available for the whole span of time that the schedule type starts and ends) you may use the OVERRIDE section on the specific activity type in the activity type section to change the start and end times for that individual activity type only, within the Schedule Type. See the Activity Types Section (the General tab, Override section) below for more details.
Number of days before the system date when the schedule is hidden on the booking engine: This field is the number of days before the current system date that the activity availability schedule will be hidden online- if the current date is too close, any scheduling will need to be done MANUALLY rather than be possible to complete online using the booking engine. If a reservation is attempted online, the guest will receive a pop up message asking them to please call (Property) to book their activity, rather than being allowed to continue with the booking engine. This is to help ensure that double booking does not occur. Enter the appropriate number of days. By default it is 0 ("day of").
E-mail: Skyware's Property Definition screen has a field for the e-mail address for your Property (that you wish the confirmations (and any other
emailed documents) to originate from). If an e-mail address is entered into this field it will be used by Skyware INSTEAD of the e-mail entered on the Property Definitions screen, for this Schedule Type. Thus for example, your Spa may have a different e-mail address to your Hotel.
Username: If an e-mail address is entered to be used by Skyware INSTEAD of the e-mail entered on the Property Definitions screen for this Schedule Type, enter the user name to be associated here.
Password: If an e-mail address is entered to be used by Skyware INSTEAD of the e-mail entered on the Property Definitions screen for this Schedule Type, enter the password to be associated here.
CC (optional): E-mail carbon copy. Enter an e-mail address for which any e-mail sent for this Schedule Type should be CC'd to here, if desired. This field is optional.
Confirmation E-mail: You may choose to have a custom document sent AUTOMATICALLY as an e-mail when an activity reservation is entered in to the Activity Schedule for this Schedule Type. The drop-down menu offers you the available choices for this document. Select one. The e-mail will be sent to the guest e-mail address associated with the activity reservation. If the option you desire is not available in the drop-down menu, you can create one. See Activity Documents for more details.
Signature Requested?: This box may be checked or unchecked. by default it is unchecked. For an electronic signature request e-mail to be sent automatically at the time of confirmation, this box must be checked. Otherwise, the e-mail sent as the check-in e-mail will not require a signature.
Note: If you select this option you MUST select a document to be sent as the e-mail signature request for this function to be used successfully. See Electronic Document Signing for Activities for more details.
Reminder E-mail: You may choose to have a custom document sent as a reminder AUTOMATICALLY as an e-mail during your Night Audit a specified number of days before the activity is scheduled for. The drop-down menu offers you the available choices for this document. Select one. If you choose to use this field you will also need to complete the "Days before" field. The e-mail will be sent to the guest e-mail address associated with the activity reservation. If the option you desire is not available in the drop-down menu, you can create one. See Activity Documents for more details.
Days before: Number of days before the reminder e-mail is sent. This option goes with the reminder e-mail - if you have selected a document to send, you MUST specify here how many days before the activity appointment takes place it should be sent. Enter a number in this field if a reminder e-mail is to be sent. 0 means the e-mail will be sent "day of".
Signature Requested?: This box may be checked or unchecked. by default it is unchecked. For an electronic signature request e-mail to be sent as the reminder e-mail, this box MUST be checked. Otherwise, the e-mail sent as the reminder e-mail will not require a signature.
Note: If you select this option you MUST select a document to be sent as the e-mail signature request for this function to be used successfully. See Electronic Document Signing for Activities for more details.
Cancellation E-mail: You may choose to have a custom document sent AUTOMATICALLY as an e-mail when an activity reservation entered in to the Activity Schedule for the Schedule Type is canceled. The drop-down menu offers you the available choices for this document. Select one. The e-mail will be sent to the guest associated with the activity reservation.
Check-Out E-mail: You may choose to have a custom document sent AUTOMATICALLY as an e-mail when an activity has been completed. The drop-down menu offers you the available choices for this document. Select one. The e-mail will be sent to the guest associated with the activity reservation.
Note: Your available options for Confirmation, Reminder, Cancellation and Check-Out e-mails may be configured using the Activity Documents command in the Documents section of your Other Front Desk Tasks Menu.
Confirmation Text: You may choose to have a custom document sent AUTOMATICALLY as a text when an activity reservation is entered in to the Activity Schedule for this Schedule Type. The drop-down menu offers you the available choices for this document. Select one. The text will be sent to the guest associated with the activity reservation.
Reminder Text: You may choose to have a custom document sent as a reminder AUTOMATICALLY as a text at 8 am the following morning after your Night Audit a specified number of days before the activity is scheduled for. The drop-down menu offers you the available choices for this document. Select one. If you choose to use this field you will also need to complete the "Days before" field. The text will be sent to the guest associated with the activity reservation.
Days before: Number of days before the reminder text is sent. Enter a number in this field if a reminder text is to be sent. 0 means the text will be sent "day of".
Cancellation Text: You may choose to have a custom document sent AUTOMATICALLY as a text when an activity reservation entered in to the Activity Schedule for the Schedule Type is canceled. The drop-down menu offers you the available choices for this document. Select one. The text will be sent to the guest associated with the activity reservation.
Check-Out Text: You may choose to have a custom document sent AUTOMATICALLY as a text when an activity has been completed. The drop-down menu offers you the available choices for this document. Select one. The text will be sent to the guest associated with the activity reservation.
Note: Your available options for Confirmation, Reminder, Cancellation and Check-Out text may be configured using the Texting Custom Messages (Activities) command in the Documents section of your Interfaces Maintenance Menu .
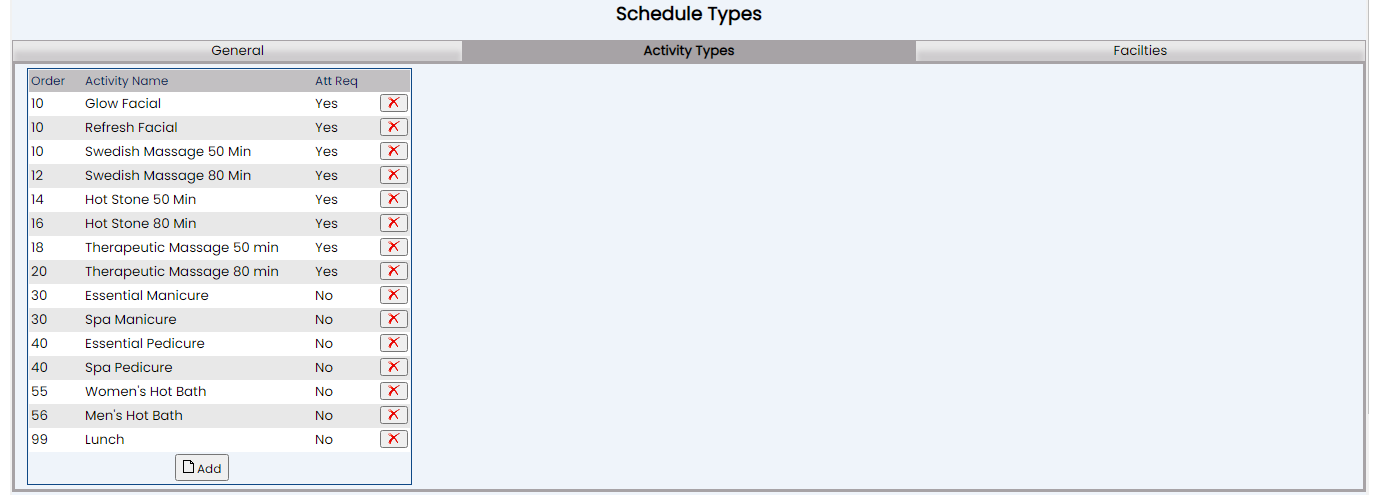
Activity types are the activities that may be performed or undertaken associated with the Schedule Type. These would include for example any type of massage you offer in your Spa, or swimming in your pool. To add or edit your activity types first open the Activity Types tab.
When you first add a Schedule Type, this tab will be empty. Activity types need to be added to allow you to use them with the specified Schedule Type. You will need to click the gray Add button to add any desired Activity Types.
Note: When generating a NEW Schedule Type, the Add button in this section will NOT be available until after the Schedule Type has been saved.
Saving the Schedule Type will generate an entry for it on the left side for the Schedule Type screen, and make the Add button visible.
Clicking the Add button opens the Activity Types For... Screen, where you may enter the details for the Activity Type, and add the ability to take a deposit for the Activity, if desired.
The Activity Type For... screen display is split into two frames, with the left side of the screen displaying a list of the already configured Activity Types, and the right side of the screen with two tabs, General and Other/Comments. The screen will by default open to the General tab, which provides the configuration fields you need to complete in order to add a new Activity Type. The Other/Comments tab provides options for choosing if a deposit should be charged, and how much said deposit should be, as well as the description section, for adding detailed information describing the activity.
Note: When you use the Add button to enter this screen, it is with the expectation that you will be ADDING a new activity. Thus, you CANNOT display on the right any of the already configured activities from those listed on the left, UNLESS you first click the cancel button in the local tool bar. This will then cause the first activity in the list on the left to be displayed, the rest of the list can now be selected from and the new and replicate buttons will have become live. This way you may EDIT an activity already generated or use one to generate a similar one.
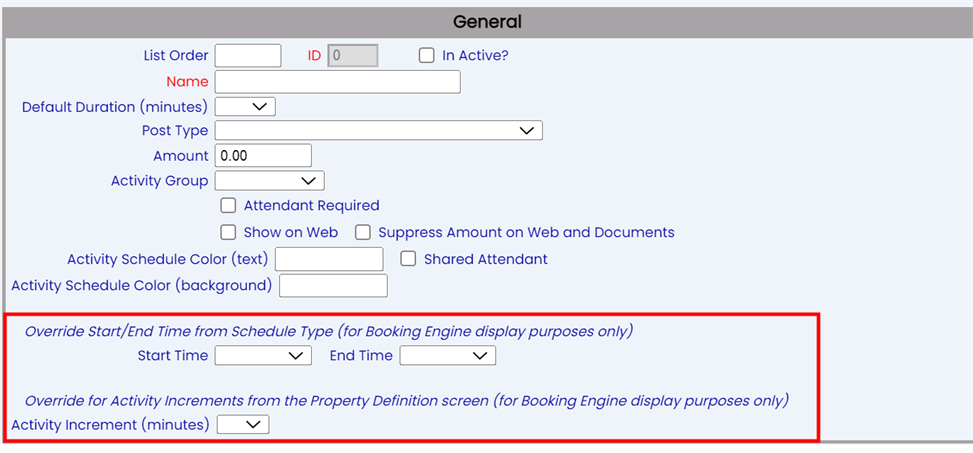
To add an Activity, complete the fields described below.
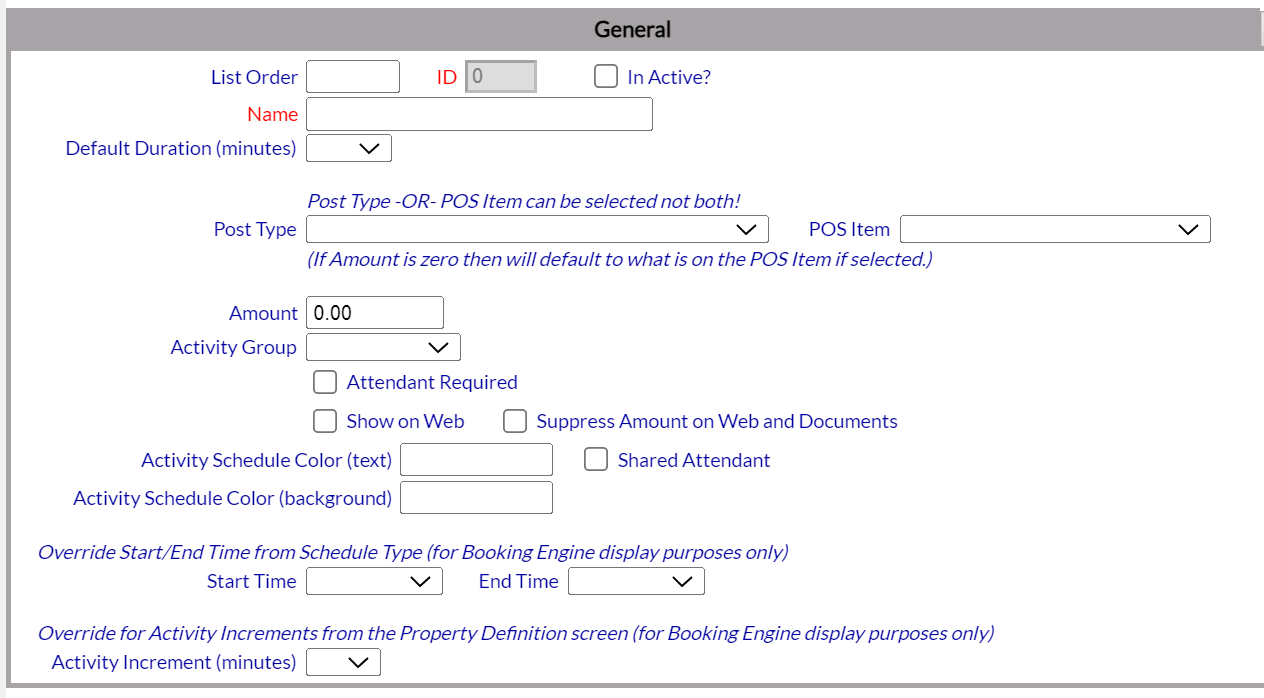
List Order: This determines in what order the Activity Types appears listed in the interface and in the Activity Types section.
Enter a number into the List Order field.
This field is optional, however we recommend that you list the Activity Types in the order you prefer. This makes it easier for staff to find the Activity Types they need. If there is no list order number, the Activity Types will be displayed alphabetically.
ID: This is AUTOMATICALLY generated by Skyware Systems for internal use and cannot be changed.
Inactive?: This box may be checked or unchecked. If this box is checked, the activity is not available currently. This option may be useful if you offer seasonal activities (such as skiing in winter, horse riding in summer).
Name: Enter the name of the Activity Type in this field. Be sure to make it easily recognizable by your staff.
This field is required.
Default Duration: Duration that is used when making a web reservation for the activity. This is a drop-down menu of time increments, in minutes, ranging from 15 to 480. Select one or leave blank.
Post Type: Posting Type for the Activity. This is a drop-down menu of all available Posting Types configured for your Property. Select one if there is a charge to be assessed with this activity.
POS Item: Activity Types can now have a menu item attached instead of a posting type. This allows the activities to appear on all Point of Sale reports. This option is a drop-down menu of all available POS Items configured for your Property (see Configure Menu or POS Items - General for an overview and help in configuring any POS items you wish to use). Select one if appropriate.
Note: Post Type OR POS Item can be selected, not both.
Amount: The amount to be charged for this activity or service. Enter the amount manually into the field. By default this field is set to 0.00 (no charge).
Note: When the POS Item rather than Post Type option has been selected, if the amount field is left as zero the amount charged will default to what has been set for the POS Item.
Note: If you have entered a charge in this field you MUST select a Posting Type for it to be associated with.
Activity Group: the activity grouping or classification the activity type belongs to. This is a drop-down menu of available options. Select one or leave blank.
Attendant required: This box may be checked or unchecked. Many activities will require an Attendant to perform them. If so, this box must be checked.
Once an Activity has been added, the Activity Types section on the Schedule Type screen will show if an attendant is required for the activity (yes or no).
Shared Attendant: This box may be checked or unchecked. If this box is checked, it indicates one attendant may oversee several guests undertaking an activity (such as using your pool).
Show on Web: This box may be checked or unchecked. If checked, the activity will be visible and available for reservations made online.
Suppress Amount on Web and Documents: This box may be checked or unchecked. If checked, the amount to be charged for the activity will NOT be displayed online or on any documents (allows the property to suppress the amount being displayed on the booking engine for this activity - useful if the amount is 0.00).
Activity Schedule Color (text): Custom TEXT color for the entry on the Activity Schedule. You may choose the color for the words in the entry for the reservation on the Activity Schedule by entering it into this field. (For example, #55ff00).
Activity Schedule Color (background): Custom BACKGROUND color for the entry on the Activity Schedule. You may choose the color for the background in the entry for the reservation on the Activity Schedule by entering it into this field.
Using these custom color options for your Property can help ensure that the different activities entered into your Activity Schedule are immediately recognizable at a glance.
Override section:
Override Start/End Time from Schedule Type (for Booking Engine display purposes only): IF you wish this activity to be available ON THE BOOKING ENGINE with a different schedule to the Schedule Type start and end times (for example, you may have multiple facilities assigned to the schedule type available, with staggered use times for different activities, or this activity might not be available for the whole of the span of time that the schedule type starts and ends), enter the start and end times to be used here.
Start Time: Select the desired start time from the drop-down menu.
End Time: Select the desired end time from the drop-down menu.
Note: If you select a start and/or end time here it WILL override the Schedule Type start and/or end time selections being used for this activity type availability on the booking engine. You may override either start or end time, or both.
Override for Activity Increments from the Property Definition screen (for Booking Engine display purposes only): IF you wish this activity to be available ON THE BOOKING ENGINE at a different frequency (activity increment) than has been previously set up (on the Property Definition screen, Other tab) select it here. This means you may offer this activity online with more or less frequency than other activities if desired.
Activity Increment (minutes): As on the Property Definition screen, the activity increment (minutes) may be selected as 15, 30 or 60 minutes, or left blank. Select the desired option from the drop-down menu.
Note: If you select an activity increment time here it WILL override the Property Definition screen activity increment (minutes) selection being used for this activity type availability on the booking engine.
The Other/Comments tab is mostly used when a deposit will be taken for the Activity Type, when the activity is scheduled. It does however also contain the Description field.
Description: Use this field to enter a detailed description for your staff of what the Activity Type is or includes. For example, a massage may be therapeutic, swedish, or use hot stones.
When scheduling an activity, there may be a required deposit associated, depending on the Activity Type selected. (For example any type of massage you offer may require a deposit to be reserved, whereas swimming in your pool may not).
If a deposit is to be taken at the time of reservation, ONE of the three options available on the Other/Comments tab should be selected.
Choose from:
Automatically Charge Activity Amount when a Reservation is Made: Check this box if the full amount of the activity charge amount is required at the time of booking.
If a charge that is NOT the full amount is to be made, you may use one of the other two fields to specify either an amount or a percentage of the full cost to be posted at the time of the reservation.
Automatically Charge Amount when Reservation is Made: Enter an amount to be charged into this field.
Automatically Charge Percent when Reservation is Made (ex. 10%): Enter the percentage amount to be charged into this field.
Note: If any deposit requirement is entered, you will need to ensure that both the Posting Type and Amount fields on the General tab have been completed. (If not, nothing will post).
Once you have finished entering or editing the Activity Type details, click the save button (![]() ) in the local tool bar. This will save the Activity Type and update the list shown on the left side of the screen.
) in the local tool bar. This will save the Activity Type and update the list shown on the left side of the screen.
You may continue to add or edit more Activity Types using this screen. Once you have finished, you will use the Schedule Type button in the local tool bar to return to the Schedule Type screen.
You will see that the Activity Types section now contains entries for all the added activities.
Note: As throughout Skyware Systems, If you wish, you may remove any entry from this section simply by clicking the delete button on the right side of the particular entry. from here you may remove any activity simply by clicking the delete button on the right side of the particular entry.
A pop up window from Skyware Systems will ask you if you really want to delete this record. Click the blue OK button and the activity will be removed from this Schedule Type.
To EDIT a particular activity type you can click on the entry in the Activity Type section to select it.
This will open the Activity Type screen with the chosen activity already displayed on the right to allow you to edit the details (as above).
Facilities are the resources you have for undertaking your Activity Types. These can be your rooms where the Activity may be performed, specific areas (such as lanes in your swimming pool) or particular vehicles (for example if you offer airport shuttle transport, you may have more than one vehicle, or even the individual seats may be assigned separately).
Note: It is recommended that you configure your Activity Types BEFORE configuring your Facilities, as during Facility configuration you may specify the Activity Types to be associated with the Facility.
When you first add a Schedule Type, this tab will be empty. Facilities need to be added to allow you to use them with the specified Schedule Type. You will need to click the gray Add button to add any desired Facilities.
Note: When generating a NEW Schedule Type, the Add button in this section will NOT be available until after the Schedule Type has been saved.
Saving the Schedule Type will generate an entry for it on the left side for the Schedule Type screen, and make the Add button on the Facilities tab functional.
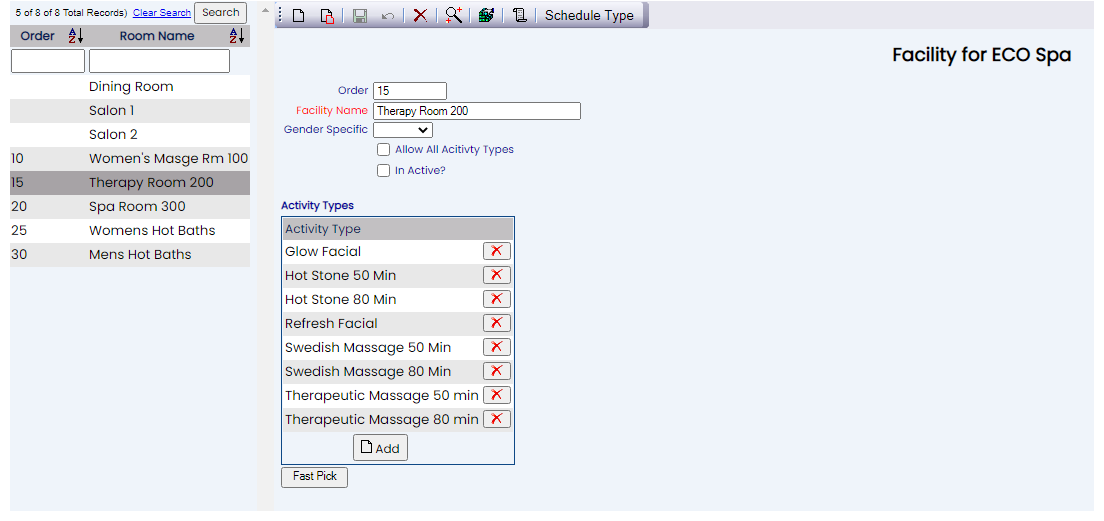
Clicking the Add button opens the Facilities For... Screen, where you may enter the details for the Facility.
The Facility For... screen display is split into two frames, with the left side of the screen displaying a list of the already configured Facilities, and the right side of the screen providing the configuration fields you need to complete in order to add a new Facility.
Note: When you use the Add button to enter this screen, it is with the expectation that you will be ADDING a new facility. Thus, you CANNOT display on the right any of the already configured facilities from those listed on the left, UNLESS you first click the cancel button in the local tool bar. This will then cause the first facility in the list on the left to be displayed, the rest of the list can now be selected from and the new and replicate buttons will have become live. This way you may EDIT an facility already generated or use one to generate a similar one. Also, only once a Facility entry has been saved will the Activity Type section become live (allowing you to link the facility to specific activity types if desired).
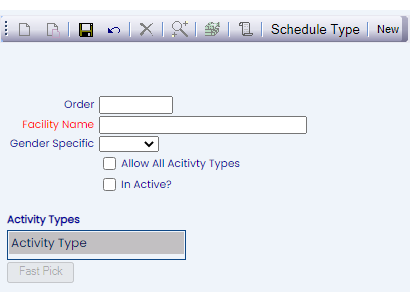
To add a Facility, complete the fields described below.
Order: This determines in what order the Facilities appear listed in the interface and in the Facilities section.
Enter a number into the Order field.
This field is optional, however we recommend that you list the facilities in the order you prefer. This makes it easier for staff to find the facilities they need. If there is no list order number, the facilities will be displayed alphabetically.
Facility Name: The name of the room or facility should be entered manually into this field.
This field is required.
Gender Specific: This is a drop-down menu of your options. You may choose to specify if the facility is gender specific (for example, you may have hot baths in separate facilities for women or men) or available for both.
Allow All Activity Types: This box may be checked or unchecked. If checked, the facility may be used by ANY of the activity types associated with the Schedule type this facility is linked to.
Note: If this option is selected, upon saving the activity types section will no longer be shown. If the facility is to be linked to specific activity types only, these can be selected in the activity types section of the screen, after the facility entry has been generated.
In Active?: This box may be checked or unchecked. If this box is checked, the facility is not available currently. This option may be useful if you offer seasonal activities using this facility (such as an ice skating rink in winter).
Once you have completed the above details, click the save button (![]() ) in the local tool bar. This will save the Facility and update the list shown on the left side of the screen. It will also (if you did NOT select to allow all activity types) make the Add button in the Activity Type section available, and the Fast-Pick button live.
) in the local tool bar. This will save the Facility and update the list shown on the left side of the screen. It will also (if you did NOT select to allow all activity types) make the Add button in the Activity Type section available, and the Fast-Pick button live.
If the facility you have added is NOT to be available to ALL activity types in the Schedule Type, you should use this section to enter those that WILL use this facility.
1. You may do this INDIVIDUALLY, using the Add button in the section to open the "Activity Type For Facility screen".
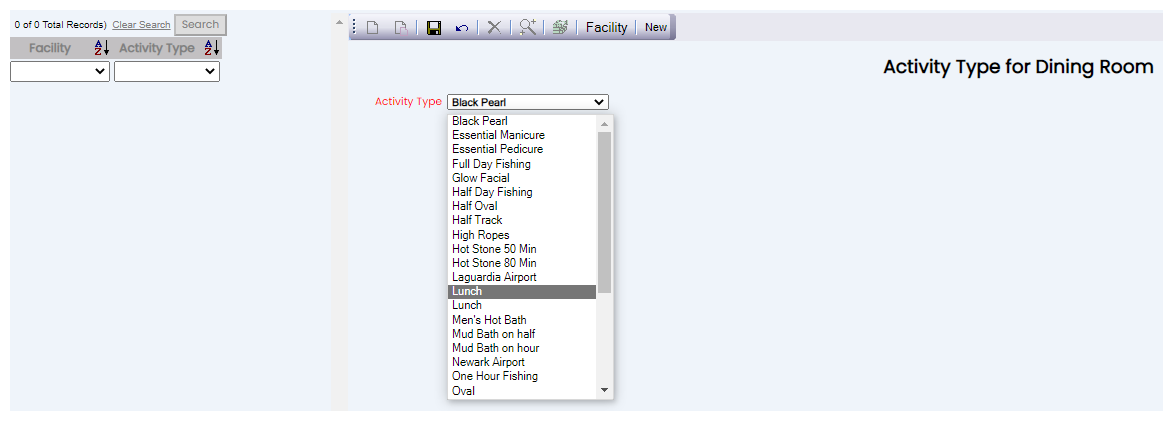
On this screen, you have one field, Activity Type, to select. This is a drop-down menu of ALL activity types generated (not just those associated with the specific Schedule Type). Select the correct option then click the save button (![]() ) in the local tool bar. This will save the activity type and update the list shown on the left side of the screen. You may repeat this as needed for this facility. Once you have completed the list, use the Facility button in the local tool bar to return to the Facility screen, where the added options will be visible in the Activity Type section.
) in the local tool bar. This will save the activity type and update the list shown on the left side of the screen. You may repeat this as needed for this facility. Once you have completed the list, use the Facility button in the local tool bar to return to the Facility screen, where the added options will be visible in the Activity Type section.
2. Alternatively, if you have MULTIPLE activities using this facility for this schedule type, you should click the gray button Fast Pick.
This will open a separate Fast Pick window, listing ALL the activities currently configured for the Schedule Type the facility is linked to. Simply check any activities that will use this facility, then click the orange button Save and Exit. This will now update the Facility screen with ALL the activity options chosen.
The Fast Pick option is the quick way of adding multiple activity types to a facility.
Note: As throughout Skyware Systems, If you wish, you may remove any entry from this section simply by clicking the delete button on the right side of the particular entry.
A pop up window from Skyware Systems will ask you if you really want to delete this record. Click the blue OK button and the activity type will be removed from this facility.
Once you are happy with the activity types to be associated with THIS facility, you may continue to add or edit more facilities using this screen. Once you have finished, you will use the Schedule Type button in the local tool bar to return to the Schedule Type screen.
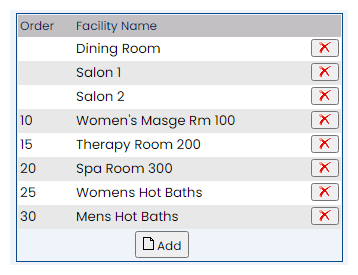
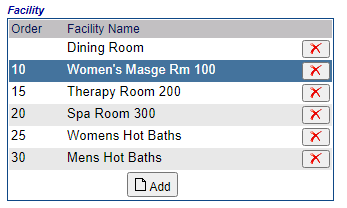
You will see that the Facilities section now contains entries for all the added Facilities.
Note: As throughout Skyware Systems, If you wish, you may remove any entry from this section simply by clicking the delete button on the right side of the particular entry.
As with the Activity Type section, to EDIT a particular facility you can click on the entry in the Facility section to select it.
This will open the Facility screen with the chosen facility already displayed on the right to allow you to edit the details (as above).
